rob Posted March 13, 2010 Posted March 13, 2010 Well I bought the Mossie before Christmas, and have been collecting Mossie info for over 30 years So the Box is opening tomorrow........ Do you think i've got enough reference material then? What do you Guys (and Gals!!) think? Regards Rob.....
T-Tango Posted March 13, 2010 Posted March 13, 2010 No, I think you need lots more reference material.
daz greenwood Posted March 13, 2010 Posted March 13, 2010 Hmmmmmmmmm I think so! But.................I can't see "Terror in the starboard seat"!
rob Posted March 14, 2010 Author Posted March 14, 2010 Hmmmmmmmmm I think so!But.................I can't see "Terror in the starboard seat"! OK i'll dig out the non fiction library as well then, I do own a copy of "Terror in the starboard seat" a brilliant read.... Regards Rob......
T-Tango Posted March 14, 2010 Posted March 14, 2010 OK i'll dig out the non fiction library as well then, I do own a copy of "Terror in the starboard seat" a brilliant read....Regards Rob...... And a copy of '633 Squadron' dvd, with the theme music playing in the background as you build it.
rob Posted March 14, 2010 Author Posted March 14, 2010 Unfortunately the box stayed firmly shut!! Kids took myself and SWMBO out for a meal after I finished work today..... But I now have 6 days off work and i'm going to get stuck in first thing. Woo! Hoo! Regards Rob.....
RobMac Posted March 14, 2010 Posted March 14, 2010 At the rate we're going with all these 24th scale Mossie builds, we'll have 633 Squadron!! Good luck with the build Rob, look forward to see what you do with yours
atdb27 Posted March 14, 2010 Posted March 14, 2010 From your pic looks like it will be the bigger "Dogfight Double" Nice ref material. Q What is the Mosquito FbVI book like? Also good is In Action Pt2, Walk Around #15 and Airfix Classic Aircraft #7. As you may have seen 'shares' in a preferred filler will be reqd for this build Good Luck. Adrian
rob Posted March 14, 2010 Author Posted March 14, 2010 (edited) From your pic looks like it will be the bigger"Dogfight Double" Nice ref material. Q What is the Mosquito FbVI book like? Also good is In Action Pt2, Walk Around #15 and Airfix Classic Aircraft #7. As you may have seen 'shares' in a preferred filler will be reqd for this build Good Luck. Adrian The Mosquito FBVI book is excellent totally recommended, but the best IMO is the Mosquito Manual. Can you imagine the Flying base stand for the "dogfight double" it'd be as big as my front door!!!! Yes i'm really looking forward to the epic filling of the ejection points.............Not!!!!!!!!! Regards Rob... Edited March 14, 2010 by rob
rob Posted March 14, 2010 Author Posted March 14, 2010 At the rate we're going with all these 24th scale Mossie builds, we'll have 633 Squadron!! Good luck with the build Rob, look forward to see what you do with yours Really appreciate your thoughts mate, but my Mossie is just a kit of parts, what you're attempting with your Mega B17 is real modelling, something I could never match. Regards Rob....
atdb27 Posted March 14, 2010 Posted March 14, 2010 The Mosquito FBVI book is excellent totally recommended, but the best IMO is the Mosquito Manual.Can you imagine the Flying base stand for the "dogfight double" it'd be as big as my front door!!!! Yes i'm really looking forward to the epic filling of the ejection points.............Not!!!!!!!!! Regards Rob... Thanks for that Rob, Will look to getting these 2. "Filling" 2/3rds of the way there (so far) Phew! Adrian
rob Posted March 15, 2010 Author Posted March 15, 2010 (edited) And todays reason? yes you've guessed it a Red Panda! my Daughter has adopted one at Chester Zoo and she wanted to see it.... And here's the guilty critter..... lovely isn't it? Regards Rob..... Maybe tomorrow............................ Edited March 15, 2010 by rob
Shar2 Posted March 15, 2010 Posted March 15, 2010 I received my big Mossie today, so will be watching all builds with great interest. So, come on Rob, get a move on.
Angels49 Posted March 16, 2010 Posted March 16, 2010 (edited) Do you think you'll get started by Sept.....you should be done reading all the ref material by then.......... . Should be a fab build. Edited March 16, 2010 by Angels49
rob Posted March 19, 2010 Author Posted March 19, 2010 Finally opened the box!!! God it's a monster.. Not much space Some new toys to play with The first of many ejector marks!!! A bit of pre shading (this is my first airbrush ever!) God beats a hairy stick everytime... (you can bet a disaster is just around the corner!!) A few more bits done. Tomorrow I get the hairy stick out for the fine detail stuff To be continued... Please feel free to point out any issues my inexperience with an Airbrush is showing... Regards Rob.......
Andrew Posted March 20, 2010 Posted March 20, 2010 Lovely start made, Rob. I look forward to more of your pics and progress. Out of curiosity, how big is that cutting mat? A1 size perhaps? Maybe even A0? I've suddenly get cutting mat envy. cheers, Andrew.
rob Posted March 20, 2010 Author Posted March 20, 2010 Lovely start made, Rob. I look forward to more of your pics and progress.Out of curiosity, how big is that cutting mat? A1 size perhaps? Maybe even A0? I've suddenly get cutting mat envy. cheers, Andrew. I think it's an A1 mat (36x24) thought I'd need a bit mat for this kit got it from Hobbycraft in Stockport for just under £17, bargain I thought Except I forgot to by a ticket for the car park (50p!) and had to pay a £60 fine! I wrongfully assumed that it was a free carpark!! Hey! Ho! Such is life in the pursuit of polystyrene nirvana!! Regards to all Rob......
Andrew Posted March 20, 2010 Posted March 20, 2010 Thanks Rob, pity though that it cost so much!. You've certainly gathered quite an impressive array of tools in preparation - good choice on the Iwata Eclipse and very good results for all your professed lack of experience; hope that things continue as well. cheers, Andrew.
rob Posted March 20, 2010 Author Posted March 20, 2010 Thanks for your comments Andrew, it's really appreciated. I'll admit to using an airbrush once before about 30 Years ago, it was a single action Badger with an aerosol propellant can, I used it once and hated it!! put me off them for Years and drove me firmly back to the brushes. I hadn't really done any kits for about 10 Years (but would always buy interesting Kits in that time) but when Airfix announced the Mossie I new i'd have to have several so I bought three with the intention of making one out of the box with just a change of markings, the second one is going to be an all out superdetailed replica of Pickards "Operation Jericho" Mossie using the Kit markings and the inevitable aftermarket resin and PE stuff that'll appear this year (Neil at Paragon has already confirmed he's working on some upgrades!). So because it such a big canvas I decided to go over to an Airbrush again, so did some research and the Iwata stuff was always highly praised, and after an interesting conversation with Dave at Halifax Modellers World I took the plunge, I also bought a cheap compressor with a tank from Airbrush Pro. I honestly find it very easy to use! But i'm sure it'll bite me on the backside when I least expect it in the future though!! The third kit was going to be a Bomber conversion, but the rumours flying about say that Airfix wil launch one in the future so i'll wait for an aftermarket company to get brave (are you listening Neil!) and release a Sea Mosquito conversion and i'll do that. I picked up some new paints today from Dave for the little details so hopefully I might get a few hours in tonight if i'm lucky. Regards Rob.....
rob Posted March 30, 2010 Author Posted March 30, 2010 Well sorry about the delay, but got the basics of the RR Merlins together and got them base coated Chucked a bit at the Instrument Panel as well To be continued
rob Posted March 31, 2010 Author Posted March 31, 2010 Don't worry about the Hi-Jacking Rob! She looks better than a Mossie anyway Oh! BTW that pic is excellent... Regards Rob....
RobMac Posted April 1, 2010 Posted April 1, 2010 I've removed the post with the two pictures in I posted yesterday Rob. It was to off topic to leave it on but you know what I mean now regarding an airbrush
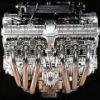
rob Posted April 7, 2010 Author Posted April 7, 2010 (edited) OK Guys and Gals your opinions please, i've drybrushed the engines and the Instrument panel do you think i've gone a little too far? Also how would you simulate an oil leak or spilt oil on the engine casing? Regards Rob.... Edited April 7, 2010 by rob
modelman182 Posted April 7, 2010 Posted April 7, 2010 Do you think i've got enough reference material then?What do you Guys (and Gals!!) think? Regards Rob..... You missed one!!!!! hee hee hee... Seriously, though - you should be okay! After all - once you take out the ceiling and fix the skyhooks to the rafters, you MIGHT have somewhere to display it! LOL! Kev
Alain De Loor Posted April 7, 2010 Posted April 7, 2010 OK Guys and Gals your opinions please, i've drybrushed the engines and the Instrument panel do you think i've gone a little too far? Also how would you simulate an oil leak or spilt oil on the engine casing? Regards Rob.... I think, IMHO, that the engine wear looks great... For oil leaks, I just use some gloss clear with a fine brush, just to have a "wet" look. I find this gives the onlooker choice to interpret what he sees without being too obvious. Also, have a look at your and your friends car engine and see where leaking oil tends to pool and how it looks -Al
Recommended Posts
Create an account or sign in to comment
You need to be a member in order to leave a comment
Create an account
Sign up for a new account in our community. It's easy!
Register a new accountSign in
Already have an account? Sign in here.
Sign In Now